Duct Tape Megaphone

Duct Tape Megaphone - Step 1

Step 1

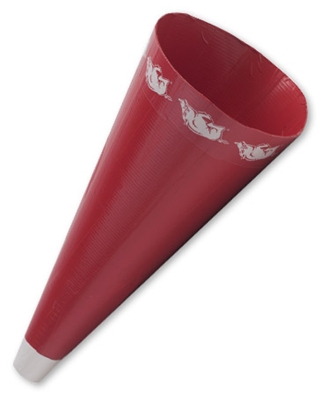
First, shape your poster board into a cone shape (for this example we used red poster board, but you can use any color). Cut the top and bottom at an even angle so that the edges are level. Tape the exposed ends of the poster board so that it holds its cone shape.

Duct Tape Megaphone - Step 2

Step 2

Cover the entire cone in duct tape.

Duct Tape Megaphone - Step 3

Step 3

Decorate your megaphone by applying the colored Duct Tape of your favorite team or other duct tape designs around the edges.

Posted in Uncategorized | 1 Comment

Breast Cancer Awareness Pink Ribbon

Directions

Step 1

Cut a 12-inch strip of Pink Duct Tape.

Step 2

Carefully fold the strip lengthwise, sticky side to sticky side, to create a double-sided strip.

Step 3

Trim off sticky edges.

Step 4

Lay the right side of the ribbon (double-sided strip) over the left side, creating a loop at the top.

Step 5

Secure the ribbon together by placing a small piece of duct tape between the pieces.

Step 6

Cut the ends of the ribbon at a 45-degree angle.

Step 7

Use a straight or safety pin to attach the ribbon to your clothes, bag, etc.

Posted in Uncategorized | 1 Comment

How to make a Duct Tape Hat

Fold a long strip of duct tape over on itself so that there are no sticky areas. Wrap this strip loosely around your forehead and mark where it overlaps.

Make a sheet of duct tape fabric about ten inches (25 cm) wide, and as long as the strip up to your mark

Form this sheet into a cylinder by matching the short sides and taping them together.

Make the top of the hat.

Make another sheet of duct tape fabric, this one about one-third wider than the hole in the cylinder.

  • Place the cylinder on the duct tape sheet and trace the hole onto the sheet, trying to keep it as circular as possible. Touch up the trace as much as possible with the compass, keeping the trace as close as possible to the size of the hole.
  • Draw a circle that has the same center as the trace, but is one-third bigger. Cut out this bigger circle (which contains the trace of the smaller circle).

  • Bigger circle in black, smaller circle (cylinder outline) in purple, cuts shown in blue

    Bigger circle in black, smaller circle (cylinder outline) in purple, cuts shown in blue

    Make about eight to ten equally-spaced cuts from the edge of the sheet (the bigger circle) to the edges of the smaller circle, all pointing toward the center of the circles.

  • Fold the newly-made strips downward and tape them to the inside of the cylinder. Make sure to cover any sticky sides.

Make the brim of the top hat.

  • Cut a piece of cardboard about one-third bigger than the hole in the cylinder.
  • Place the cylinder on the cardboard and trace the hole onto the sheet, trying to keep it as circular as possible. Touch up the trace as much as possible with the compass, keeping the trace as close as possible to the size of the hole.

  • Draw a circle that has the same center as the trace, but is one-third bigger. Cut out this bigger circle (which contains the trace of the smaller circle).
  • Cut a small hole in the center of the cardboard.
  • Bigger circle in black, smaller circle (cylinder outline) in purple, small center hole and cuts shown in blue

    Bigger circle in black, smaller circle (cylinder outline) in purple, small center hole and cuts shown in blue

    Cut eight to ten equally-spaced strips from the center hole to the smaller trace (the outline of the cylinder).

  • Fold the newly-made strips upward and tape them to the inside of the cylinder. Make sure to cover any sticky sides.

Posted in Uncategorized | 3 Comments

How to make a Duct Tape Tie


Duct tape tie

Duct tape tie

  1. Start by taking measure of the old silk, to determine the size of your tie.
  2. Take the roll of duct tape, and cut it into strips one half inch wider than the tie on each side.
  3. Place the strips on the front of the tie, overlapping about a half an inch. Start at the bottom, so it can be waterproof and easier to tie.
  4. Place a piece of duct tape lengthwise along the back of the tie. Cut a couple more to cover it. Remember where the loop on the back is.
  5. Fold the edges of the front duct back.
  6. Put a half a piece of duct tape along the back edge of the tie.
  7. Take a piece of duct tape and fold the edges over on the bottom. Take this piece and loop it.
  8. Hold the piece and tape it where the loop was.
  9. Decorate and finish.
  10. You’ve just made a duct tape tie.
Posted in Uncategorized | 1 Comment

How to make a Duct Tape Book or Bible Cover


My homemade Duct tape book cover


First you will make a Duct Tape sheet longer that your book when it is open plus extra for flaps.

For this, cut multiple sheets of Duct tape longer  than the length of your book while open plus 4-8 inches (depending on how thick you would like your flaps that will hold your book in its cover).  Place your first strip sticky side up. Next place another sheet sticky side down vertically across your first piece and halfway up so that there is equal sticky overlapping on top and bottom. Flip the strip over and with your next piece place it either below or above the second strip of tape so that the sticky area is completely covered. This will leave another half piece of sticky overlap.

Repeat this process over and over until you your Duct tape sheet is  about a strip and a half wider than your book is top to bottom. Fold over your sticky pieces and give the top and bottom of your cover a clean look.

Cut the ugly ends of your duct tape book cover so that they are clean as well. Now, place your open book in the middle of the sheet so that the flaps are equal on both sides. Now fold the flaps tight over the front and back covers of your book and tape the top and bottom parts of only your flaps (this way the hard part of your book can easily slide in and out of the Duct tape flaps.

That is it. You have a Duct tape book cover!

Posted in Uncategorized | 1 Comment

How to make a Duct Tape iPhone case


Duct Tape iPhone case


Materials:

  • iPhone
  • Duct Tape (one or two colors)
  • Scissors or exact-o knife

Take two 7 inch strips of Duct tape the color that you want for the inside. Take two 8 inch strips of tape the color you would like for the outside. Stick the shorter inside color to the longer outside color on sticky sides with the extra inch hanging over on one side.

Wrap the first strip around the sides of your iPhone with the longer piece of tape on the outside. Wrap it tight enough that its snug but you can still slide your phone in and out. Do this with both pieces side by side.

While both wrapped pieces are tightly side by side wrap a new strip of the outside color around the middle of both original pieces so that they are now one piece.

Cut a 4 to 5 inch piece of the outside color and a square piece of the inside color. Stick the square piece directly in the middle of larger piece (sticky sides together). Leave about an inch of overlap on the top and bottom of the longer piece. This is our bottom piece that holds the phone in. With the phone still in our original piece leave equal amount of phone hanging out on top and bottom. Now attach the bottom piece we just made around the bottom of the phone with both sticky side attached to both sides of our original piece.

Take a 6 inch piece of your outside tape a fold it in half long ways attaching the sticky side together. This is our flap holder. Wrap it around the phone short ways. Don’t make it too tight because you will be tucking your flap in there when your done. Use a square piece of your outside tape to secure the end pieces together in the back.

Take another 7 inch piece of your outside tape and attache it to the sticky side of a 5 inch piece of you inside color with about two inches of overlap. Cut the side that’s not overlapping to give it a clean look. This is our flap. Line the clean end with the bottom of our original piece on the front and pull it tight attaching  the sticky end to the back. You should be able to tuck the flap in the front holder.

Thats it! Now you have a Duct tape iPhone cover!

Posted in Uncategorized | 5 Comments

How to make a Duct Tape Rose

Materials:

  • 1 straw
    any color duct tape
    green duct tape

Take the green duct tape and stick the straw on the duct tape vertically. Wrap the green duct tape around the straw to make a stem. Now take your colored duct tape and cut or rip a 2 inch piece off. Take the right corner and fold it over to the middle, then do the same with the left. Make sure you leave some sticky part at the bottom. now you should have something that looks like a house with a colored roof, this is a petal. Pinch the center of the sticky part and the stick onto the straw. Repeat until desired size of the rose is achieved. It will take about 15 – 20 petals. There are many colors of duct tape such as… red, pink, blue, purple, yellow, turquoise, black, white, camouflage, and tie dye.

Posted in Uncategorized | 9 Comments

How to make a Duct Tape Purse

All the pieces are made by sticking duct tape to each other…sticky side to sticky side. so, you just make it as tall and as long as desired.

Image 1-3 shows your how to make the duct tape sides. once finished neaten them up by trimming them.

make a smaller side for the part of your purse that is opened…your going to attach that piece and the main piece together to make your purse

next is the small side and the main side attached together with black duct tape-for contrast. this is just showing you what it looks like with one of the sides attached, and covered.

you want to make sure you put maybe 3 pieces of duct tape all the way around the piece to where you attached to two pieces this will be more sturdy.

Next we have both sides attached, now making the form of your purse. make sure you reinforce both sides where you attach the pieces, if you dont it will be flimsy. Once you have this shape, crease the edges to make more of square shape

Here comes the tricky tricky part. your going to take a piece of tape that is the length of your purse…i should actually say the circumference. it’ll be flexible so what i did was just put it on the edge of the purse frame and rolled it along until it met my starting point. then i cut it.

once you have your tape met, cut a slit in the corners so its easier to fold down onto the base of the purse

fold down the edges onto the base, you might want to put your hand inside to use it to press against when your smoothing the tape down. this is the inside of the purse base
make sure once you have your base secure that you reinforce it on the inside. this part is really hard, because its hard to see, and hard to control the tape.
Ok, now we move onto the strap measure the length you want your strap to be and put sticky side to sticky side. if the edges don’t match up its ok, we’re going to cover them anyways with black. take the same length of black but don’t stick it to another of that size. your going to cut it in half. i had the best luck by lying it on the table and cutting it with an exacto knife. Put the black tape on either side of the pink strap, but place it so that you can fold it over onto the other side of the strap.
here’s what the strap looks like when its done.

Now we’re going to move onto making the bass of the purse. do the same thing with making the bottom as you did when making the main purse

now we’re almost done, attach the strap on the inside or outside, its your pref. just attach it using a couple pieces of duct tape.. to finish off the purse ‘seal’ the edge by putting a piece of tape, like you did the strap.

Posted in Uncategorized | 4 Comments

How to make a Duct Tape Wallet


Step 1
The first step is to create a large sheet of duct tape 8.5 inches by 7 inches. This is the key to any duct tape project, with a sheet of tape you can make anything! Rip a strip of tape at least 8.5 inches in length and place sticky side up on your working surface. rip a second piece of equal length and place sticky side down half way over the first strip. Fold the rest of the strip facing up over the second strip. Flip over the two strips and place a third strip sticky side down covering the remaining sticky part of the second strip. Flip the sheet again and continue extending the size of the sheet until the needed size is satisfied.
Step 2
Trim the edges, fold the wallet in half and tape the sides to create a large pocket to hold bills. 
Step 3
To create credit/business card pockets create another sheet 4 by 3.5 inches. 
Step 4
Fold 1.5 inches over. To create two more pockets, repeat the step above and then tape the two pieces together, taping the second pocket a little lower on top of the first piece. 
Step 5
Tape the edges of the pockets and then tape the whole piece to the large pocket. To create another pocket, leave the inside part untaped. 
Step 6
Make a sheet of tape (as in the first step) larger than your ID card. Cut the sheet so the outside part of the frame is slightly larger than the height and width of the ID. Cut the inside .5 centimeters, (big enough you can see you picture and info, but small enough the ID can’t fall through the opening. Now trim the outside so it is slightly larger in all directions than your ID. Tape three sides of this window to the inside of your wallet, or on top of the credit card holder. It’ll take a some trial an error to get it right, but it will be a great addition to the wallet. When your done, the ID should be able to slide into the untaped side of the holder, and once in, not fall through the open window.
Step 7
Tape the completed pocket to the large pocket and again you can create an extra pocket if you wish by leaving the inside part untaped. 
Step 8
This is the completed wallet. There are an infinite ways to personalize this design. Some ideas I’ve embeded in mine are coin pockets within the large bill pocket and placing flaps on the credit card holders so business cards don’t fall out when the wallet gets dropped. 
Posted in Uncategorized | 1 Comment

Duct Tape Designs

I am introducing Duct Tape Designs. This is something that has recently captured my interest and it satisfies a creative need for me.

Duct Tape Designs is what I call my compilation of Products, Instructions and Videos dedicated to creating practical products from the ever versatile Duct Tape. In the near future I will be producing online instruction sheets, you-tube videos and an apple app that will highlight them for iPhone owners.

So, if this is not your thing then ignore it. But, for those of you who want to expand your horizons, learn a little about what your kids are into or just enjoy checking out what other people do to relax then enjoy the content on this page.

Posted in Uncategorized | 18 Comments